핵심 컨셉
Bloc 패키지 사용 방법을 이해하는 데 중요한 몇 가지 핵심 개념이 있습니다.
다음 섹션에서는 각 항목에 대해 자세하게 살펴보고 카운터 앱에 적용하는 방법을 살펴보겠습니다.
Streams
Section titled “Streams”Stream은 연속적인 비동기 데이터입니다.
Bloc 라이브러리를 사용하려면 Streams과 그 작동 방식에 대한 기본적인 이해가
필요합니다.
만약 당신이 Streams이 익숙하지 않다면, 물이 흐르는 파이프를 생각하면 됩니다.
파이프는 Streams이고 물은 비동기 데이터 입니다.
async* (비동기 생성기) 함수를 작성하여 Dart에서 Stream을 생성할 수 있습니다.
Stream<int> countStream(int max) async* { for (int i = 0; i < max; i++) { yield i; }}함수를 async*로 표시하면 yield 키워드를 사용하여 데이터의 Stream을 반환할
수 있습니다. 위 예시에서는 max 정수 파라미터까지의 정수 Stream을 반환하고
있습니다.
async* 함수에서 yield 할 때 마다 해당 데이터를 Stream을 통해 푸쉬합니다.
위의 Stream을 여러 가지 방법으로 사용할 수 있습니다. 만약 정수로 이루어진
Stream의 합계를 반환하는 함수를 작성하고 싶다면 다음과 같이 작성할 수
있습니다:
Future<int> sumStream(Stream<int> stream) async { int sum = 0; await for (int value in stream) { sum += value; } return sum;}위의 함수를 async로 작성하면 await 키워드를 사용하여 정수의 Future를
반환할 수 있습니다. 이 예제에서는 Stream의 각 값을 기다렸다가 Stream에 있는 모든
정수의 합을 반환합니다.
위 모든 코드를 다음과 같이 사용할 수 있습니다:
void main() async { /// Initialize a stream of integers 0-9 Stream<int> stream = countStream(10); /// Compute the sum of the stream of integers int sum = await sumStream(stream); /// Print the sum print(sum); // 45}이제 Dart에서 Streams이 어떻게 작동하는지 기본적인 이해를 했으니, Bloc
패키지의 핵심 구성 요소: Cubit에 대해 알아볼 준비가 되었습니다.
Cubit은 BlocBase를 extends한 클래스로, 모든 유형의 state를 관리하도록 확장할
수 있습니다.
Cubit은 state의 변경을 촉발하기 위해 호출할 수 있는 함수를 외부로 노출시킬 수
있습니다.
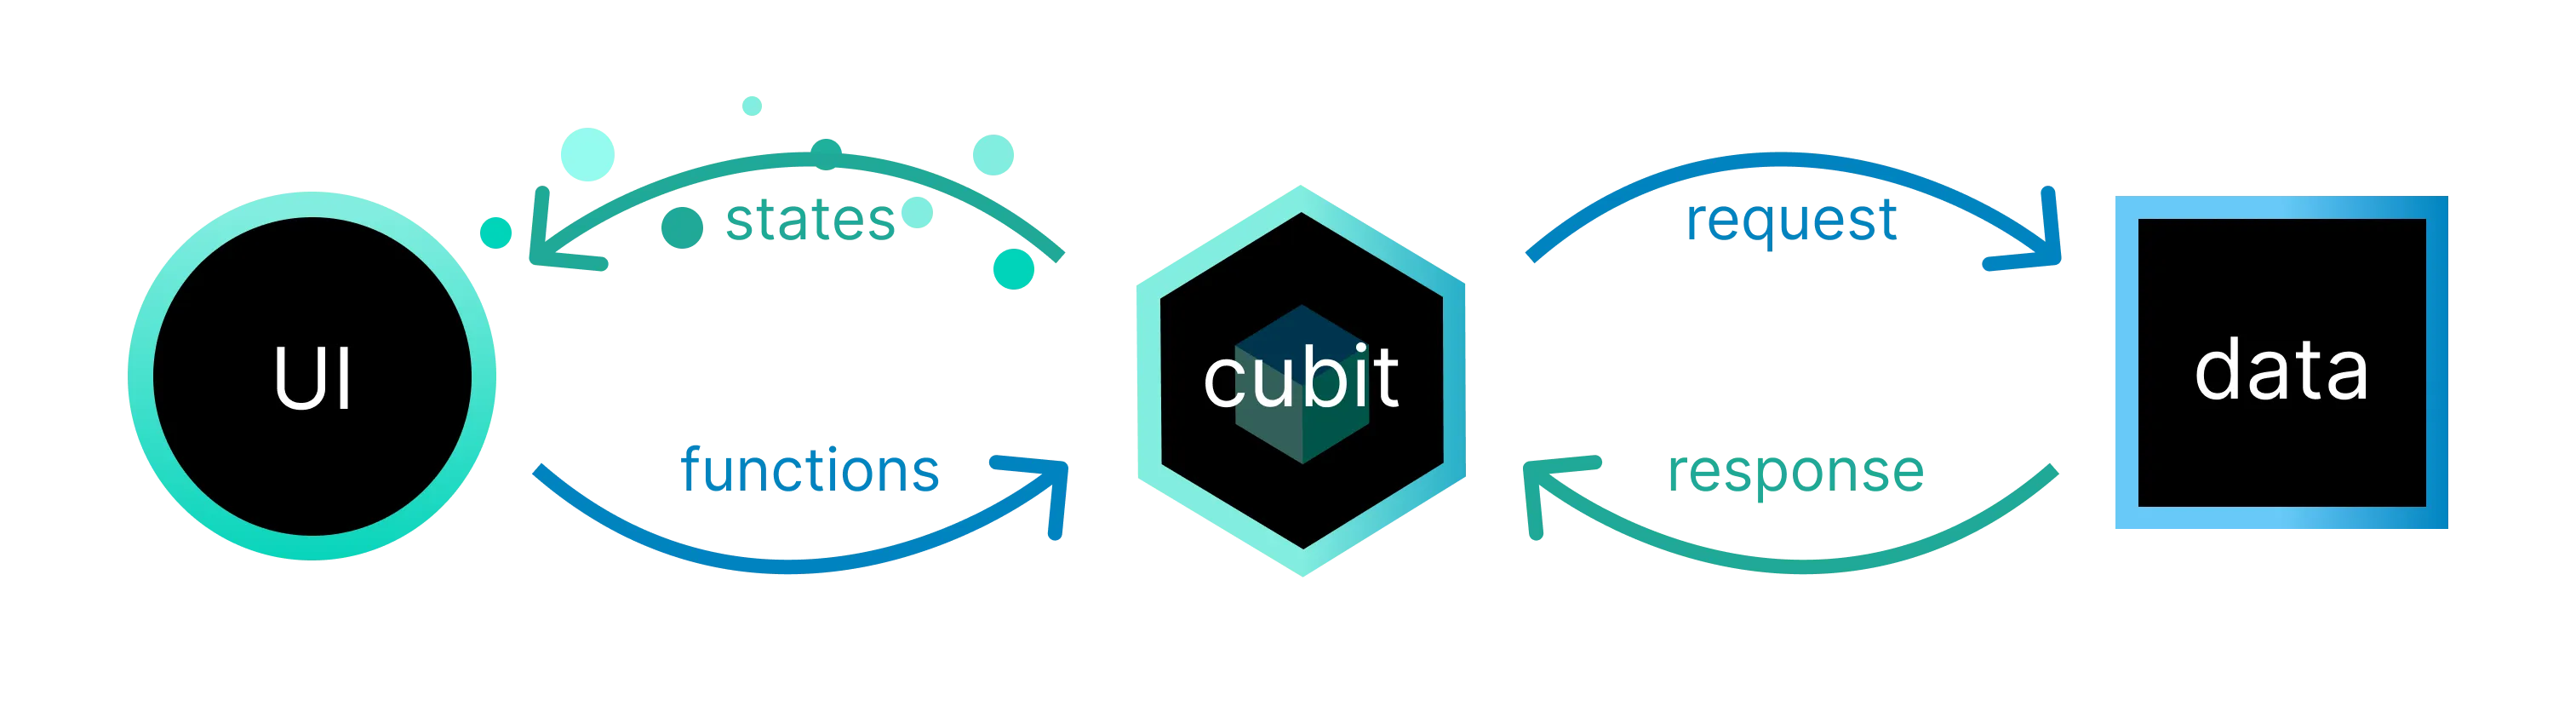
State는 Cubit의 출력이며 애플리케이션 state의 일부를 나타냅니다. UI 컴포넌트는
state에 대한 notify를 받고, 현재 state에 따라 일부를 다시 그릴 수 있습니다.
Cubit 만들기
Section titled “Cubit 만들기”다음과 같은 CounterCubit을 만들 수 있습니다:
class CounterCubit extends Cubit<int> { CounterCubit() : super(0);}Cubit을 생성할 때, Cubit이 관리할 상태의 타입을 정의해야 합니다. 위의
CounterCubit의 경우 state 타입은 int로 표현할 수 있지만, 더 복잡한 경우에는
Primitive type 대신 class를 사용해야 할 수도 있습니다.
Cubit을 생성할 때 두 번째로 해야 할 일은 초기 상태를 지정하는 것입니다. 초기
상태의 값으로 super를 호출하여 이를 수행할 수 있습니다. 위의 예시 코드는
내부적으로 초기 상태를 0으로 설정하고 있지만, 다음과 같이 외부의 값을 허용하여
Cubit이 더 유연하게 작동하도록 할 수도 있습니다.
class CounterCubit extends Cubit<int> { CounterCubit(int initialState) : super(initialState);}이렇게 하면 다음과 같이 다양한 초기 상태를 가진 CounterCubit 인스턴스를 만들
수 있습니다.
final cubitA = CounterCubit(0); // state starts at 0final cubitB = CounterCubit(10); // state starts at 10Cubit의 state변화
Section titled “Cubit의 state변화”각 Cubit은 emit을 통해 새로운 state를 출력할 수 있습니다.
class CounterCubit extends Cubit<int> {  CounterCubit() : super(0);
  void increment() => emit(state + 1);}
위의 예시 코드에서 CounterCubit은 외부에서 호출하여 CounterCubit의 state를
증가시킬 수 있는 increment 라는 public 메서드를 노출하고 있습니다.
increment가 호출되면 state getter를 통해 Cubit의 현재 state에 접근하고,
현재 상태에 1을 더하여 새로운 state를 emit할 수 있습니다.
Cubit 사용하기
Section titled “Cubit 사용하기”이제 우리가 구현한 CounterCubit을 실제로 사용할 수 있습니다!
기본 사용법
Section titled “기본 사용법”void main() { final cubit = CounterCubit(); print(cubit.state); // 0 cubit.increment(); print(cubit.state); // 1 cubit.close();}위의 예시 코드에서는 먼저 CounterCubit의 인스턴스를 생성합니다. 그런 다음 초기
state인 Cubit의 현재 state를 출력합니다 (아직 새로운 state가 emit되지
않았으므로). 다음으로 increment 함수를 호출하여 state의 변경을 촉발합니다.
마지막으로 0에서 1로 바뀐 Cubit의 state를 다시 출력하고 Cubit의
close를 호출하여 내부 state stream을 닫습니다.
Stream 사용법
Section titled “Stream 사용법”Cubit은 실시간 state 업데이트를 받을 수 있는 Stream을 노출합니다:
Future<void> main() async { final cubit = CounterCubit(); final subscription = cubit.stream.listen(print); // 1 cubit.increment(); await Future.delayed(Duration.zero); await subscription.cancel(); await cubit.close();}위의 예시 코드에서는 CounterCubit을 구독하고 각 state 변경 시마다 print를
호출하고 있습니다. 그런 다음 새로운 state를 출력하는 increment 함수를 호출하고
있습니다. 마지막으로, 더 이상 업데이트를 받고 싶지 않을 때 subscription의
cancel을 호출하고 Cubit을 닫습니다.
Cubit 관찰하기
Section titled “Cubit 관찰하기”Cubit이 새로운 state를 emit하면 Change가 발생합니다. onChange를
override하여 주어진 Cubit에 대한 모든 변경 사항을 관찰할 수 있습니다.
class CounterCubit extends Cubit<int> {  CounterCubit() : super(0);
  void increment() => emit(state + 1);
  @override  void onChange(Change<int> change) {    super.onChange(change);    print(change);  }}
그런 다음 Cubit과 상호 작용하고, 콘솔로 출력되는 모든 변경 사항을
관찰해봅시다.
void main() { CounterCubit() ..increment() ..close();}위 예시는 다음과 같이 출력됩니다:
Change { currentState: 0, nextState: 1 }BlocObserver
Section titled “BlocObserver”Bloc 라이브러리를 사용하면 한 곳에서 모든 Change에 접근할 수 있다는 장점이
있습니다. 이 애플리케이션은 하나의 Cubit만 있지만, 대규모 애플리케이션에서는
애플리케이션 state의 여러 부분을 관리하는 많은 Cubit을 사용하는 것이
일반적입니다.
모든 Change에 대응하여 무언가를 할 수 있도록 하려면 자체적으로
BlocObserver를 만들면 됩니다.
class SimpleBlocObserver extends BlocObserver { @override void onChange(BlocBase bloc, Change change) { super.onChange(bloc, change); print('${bloc.runtimeType} $change'); }}SimpleBlocObserver를 사용하려면 main함수를 조금만 수정하면 됩니다:
void main() { Bloc.observer = SimpleBlocObserver(); CounterCubit() ..increment() ..close();}위 예시 코드에 대한 출력입니다:
CounterCubit Change { currentState: 0, nextState: 1 }Change { currentState: 0, nextState: 1 }Cubit의 에러 처리
Section titled “Cubit의 에러 처리”모든 Cubit에는 에러가 발생했음을 나타내는데 사용할 수 있는 addError 메서드가
있습니다.
class CounterCubit extends Cubit<int> {  CounterCubit() : super(0);
  void increment() {    addError(Exception('increment error!'), StackTrace.current);    emit(state + 1);  }
  @override  void onChange(Change<int> change) {    super.onChange(change);    print(change);  }
@override void onError(Object error, StackTrace stackTrace) { print('$error, $stackTrace'); super.onError(error, stackTrace); }}BlocObserver에서 onError를 override하여 보고된 모든 에러를 전역적으로 처리할
수도 있습니다.
class SimpleBlocObserver extends BlocObserver {  @override  void onChange(BlocBase bloc, Change change) {    super.onChange(bloc, change);    print('${bloc.runtimeType} $change');  }
  @override  void onError(BlocBase bloc, Object error, StackTrace stackTrace) {    print('${bloc.runtimeType} $error $stackTrace');    super.onError(bloc, error, stackTrace);  }}
동일한 프로그램을 다시 실행하면 다음과 같은 출력을 볼 수 있습니다:
Exception: increment error!#0      CounterCubit.increment (file:///main.dart:7:56)#1      main (file:///main.dart:41:7)#2      _delayEntrypointInvocation.<anonymous closure> (dart:isolate-patch/isolate_patch.dart:297:19)#3      _RawReceivePort._handleMessage (dart:isolate-patch/isolate_patch.dart:184:12)
CounterCubit Exception: increment error!#0      CounterCubit.increment (file:///main.dart:7:56)#1      main (file:///main.dart:41:7)#2      _delayEntrypointInvocation.<anonymous closure> (dart:isolate-patch/isolate_patch.dart:297:19)#3      _RawReceivePort._handleMessage (dart:isolate-patch/isolate_patch.dart:184:12)
CounterCubit Change { currentState: 0, nextState: 1 }Change { currentState: 0, nextState: 1 }Bloc은 함수가 아닌 event에 의존하여 state 변경을 촉발하는 고급 클래스
입니다. Bloc은 또한 BlocBase를 extends하여 Cubit과 유사한 공용 API를 갖고
있습니다. 그러나, Bloc에서 함수를 호출하여 새로운 state를 직접 emit하는
대신, Bloc은 event를 수신하고 수신된 event를 나가는 state로 변환합니다.

Bloc 만들기
Section titled “Bloc 만들기”Bloc을 생성하는 것은 Cubit를 생성하는 것과 비슷하지만, 관리할 state를
정의하는 것 외에 Bloc이 처리할 event도 정의해야 한다는 점이 다릅니다.
Event는 Bloc에 대한 입력입니다. 일반적으로 버튼을 누름과 같은 사용자 상호 작용이나, 페이지 로드와 같은 생명 주기 이벤트에 대한 응답으로 추가됩니다.
sealed class CounterEvent {}
final class CounterIncrementPressed extends CounterEvent {}
class CounterBloc extends Bloc<CounterEvent, int> { CounterBloc() : super(0);}CounterCubit을 생성할 때와 마찬가지로 super를 통해 부모 클래스에 전달하여
초기 state를 지정해야 합니다.
Bloc의 state변화
Section titled “Bloc의 state변화”Bloc은 Cubit의 함수가 아닌 on<Event> API를 통해 이벤트 핸들러를 등록해야
합니다. 이벤트 핸들러는 들어오는 모든 event를 0개 이상의 나가는 state로 변환하는
역할을 수행합니다.
sealed class CounterEvent {}
final class CounterIncrementPressed extends CounterEvent {}
class CounterBloc extends Bloc<CounterEvent, int> { CounterBloc() : super(0) { on<CounterIncrementPressed>((event, emit) { // handle incoming `CounterIncrementPressed` event }); }}그런 다음 EventHandler를 업데이트하여 CounterIncrementPressed event를 처리할
수 있습니다:
sealed class CounterEvent {}
final class CounterIncrementPressed extends CounterEvent {}
class CounterBloc extends Bloc<CounterEvent, int> {  CounterBloc() : super(0) {    on<CounterIncrementPressed>((event, emit) {      emit(state + 1);    });  }}
위의 예시 코드에서는 모든 CounterIncrementPressed event를 관리하기 위해
EventHandler를 등록했습니다. 들어오는 각 CounterIncrementPressed event에
대해 state getter와 emit(state + 1)를 통해 bloc의 현재 상태에 접근할 수
있습니다.
Bloc 사용하기
Section titled “Bloc 사용하기”이 시점에서 CounterBloc의 인스턴스를 생성하여 사용할 수 있습니다!
기본 사용법
Section titled “기본 사용법”Future<void> main() async { final bloc = CounterBloc(); print(bloc.state); // 0 bloc.add(CounterIncrementPressed()); await Future.delayed(Duration.zero); print(bloc.state); // 1 await bloc.close();}위의 예시 코드에서는 먼저 CounterBloc의 인스턴스를 생성합니다. 그런 다음 초기
state인 Bloc의 현재 state를 출력합니다 (아직 새로운 state가 emit되지
않았으므로). 다음으로 state 변경을 촉발하기 위해 CounterIncrementPressed
event를 추가합니다. 마지막으로 0에서 1로 변경된 Bloc의 state를 다시
출력하고 Bloc의 close룰 호출하여 내부 state stream을 닫습니다.
Stream 사용법
Section titled “Stream 사용법”Cubit과 마찬가지로 Bloc은 Stream의 특수한 유형으로, Bloc을 구독하여
state를 실시간으로 업데이트 할 수도 있습니다:
Future<void> main() async { final bloc = CounterBloc(); final subscription = bloc.stream.listen(print); // 1 bloc.add(CounterIncrementPressed()); await Future.delayed(Duration.zero); await subscription.cancel(); await bloc.close();}위의 예시 코드에서는 CounterBloc을 구독하고 각 state 변경 시마다 print를
호출하고 있습니다. 그런 다음 on<CounterIncrementPressed> EvnetHandler를
촉발하고 새 state를 emit하는 CounterIncrementPressed event를 추가하고
있습니다. 마지막으로, 더 이상 업데이트를 받지 않으려면 subscription의
cancel을 호출하고 Bloc을 닫습니다.
Bloc 관찰하기
Section titled “Bloc 관찰하기”Bloc은 BlocBase를 extends 하기 때문에 onChange를 사용하여 Bloc의 모든
state 변화를 관찰할 수 있습니다.
sealed class CounterEvent {}
final class CounterIncrementPressed extends CounterEvent {}
class CounterBloc extends Bloc<CounterEvent, int> {  CounterBloc() : super(0) {    on<CounterIncrementPressed>((event, emit) => emit(state + 1));  }
  @override  void onChange(Change<int> change) {    super.onChange(change);    print(change);  }}
그런 다음 main.dart를 다음과 같이 업데이트 합니다:
void main() { CounterBloc() ..add(CounterIncrementPressed()) ..close();}위 예시 코드에 대한 출력입니다:
Change { currentState: 0, nextState: 1 }Bloc과 Cubit의 주요 차별화 요소 중 하나는 Bloc이 event 기반이기 때문에
state 변화를 유발한 원인에 대한 정보도 캡처할 수 있다는 점입니다.
이 작업은 onTransition을 override하여 수행할 수 있습니다.
한 state에서 다른 state로 변경되는 것을 Transition이라고 합니다.
Transition은 현재 state, event, 다음 state로 구성됩니다.
sealed class CounterEvent {}
final class CounterIncrementPressed extends CounterEvent {}
class CounterBloc extends Bloc<CounterEvent, int> {  CounterBloc() : super(0) {    on<CounterIncrementPressed>((event, emit) => emit(state + 1));  }
  @override  void onChange(Change<int> change) {    super.onChange(change);    print(change);  }
  @override  void onTransition(Transition<CounterEvent, int> transition) {    super.onTransition(transition);    print(transition);  }}
그런 다음 이전과 동일한 main.dart 예시 코드를 다시 실행하면 다음과 같은 출력이
표시됩니다.
Transition { currentState: 0, event: Instance of 'CounterIncrementPressed', nextState: 1 }Change { currentState: 0, nextState: 1 }BlocObserver
Section titled “BlocObserver”이전과 마찬가지로 커스텀 BlocObserver에서 onTransition을 override하여 단일
위치에서 발생하는 모든 Transition을 관찰할 수 있습니다.
class SimpleBlocObserver extends BlocObserver {  @override  void onChange(BlocBase bloc, Change change) {    super.onChange(bloc, change);    print('${bloc.runtimeType} $change');  }
  @override  void onTransition(Bloc bloc, Transition transition) {    super.onTransition(bloc, transition);    print('${bloc.runtimeType} $transition');  }
  @override  void onError(BlocBase bloc, Object error, StackTrace stackTrace) {    print('${bloc.runtimeType} $error $stackTrace');    super.onError(bloc, error, stackTrace);  }}
이전과 마찬가지로 SimpleBlocObserver를 초기화 할 수 있습니다:
void main() { Bloc.observer = SimpleBlocObserver(); CounterBloc() ..add(CounterIncrementPressed()) ..close();}이제 위의 예시 코드를 실행하면 다음과 같은 출력을 얻을 수 있습니다:
CounterBloc Transition { currentState: 0, event: Instance of 'CounterIncrementPressed', nextState: 1 }Transition { currentState: 0, event: Instance of 'CounterIncrementPressed', nextState: 1 }CounterBloc Change { currentState: 0, nextState: 1 }Change { currentState: 0, nextState: 1 }Bloc 인스턴스의 또 다른 독특한 특징은 Bloc에 새 event가 추가될 때마다
호출되는 onEvnet를 override할 수 있다는 점입니다. onChange 및
onTransition과 마찬가지로 onEvent는 전역뿐만 아니라 로컬에서도 override할 수
있습니다.
sealed class CounterEvent {}
final class CounterIncrementPressed extends CounterEvent {}
class CounterBloc extends Bloc<CounterEvent, int> {  CounterBloc() : super(0) {    on<CounterIncrementPressed>((event, emit) => emit(state + 1));  }
  @override  void onEvent(CounterEvent event) {    super.onEvent(event);    print(event);  }
  @override  void onChange(Change<int> change) {    super.onChange(change);    print(change);  }
@override void onTransition(Transition<CounterEvent, int> transition) { super.onTransition(transition); print(transition); }}class SimpleBlocObserver extends BlocObserver { @override void onEvent(Bloc bloc, Object? event) { super.onEvent(bloc, event); print('${bloc.runtimeType} $event'); }
@override void onChange(BlocBase bloc, Change change) { super.onChange(bloc, change); print('${bloc.runtimeType} $change'); }
@override void onTransition(Bloc bloc, Transition transition) { super.onTransition(bloc, transition); print('${bloc.runtimeType} $transition'); }}이전과 동일한 main.dart를 실행하면 다음과 같은 출력을 볼 수 있습니다:
CounterBloc Instance of 'CounterIncrementPressed'Instance of 'CounterIncrementPressed'CounterBloc Transition { currentState: 0, event: Instance of 'CounterIncrementPressed', nextState: 1 }Transition { currentState: 0, event: Instance of 'CounterIncrementPressed', nextState: 1 }CounterBloc Change { currentState: 0, nextState: 1 }Change { currentState: 0, nextState: 1 }Bloc의 에러 처리
Section titled “Bloc의 에러 처리”Cubit과 마찬가지로 각 Bloc에는 addError와 onError 메서드가 있습니다.
Bloc 내부 어디에서나 addError를 호출하여 에러가 발생했음을 알릴 수 있습니다.
그런 다음 Cubit과 마찬가지로 onError를 override 하여 모든 에러에 대응할 수
있습니다.
sealed class CounterEvent {}
final class CounterIncrementPressed extends CounterEvent {}
class CounterBloc extends Bloc<CounterEvent, int> {  CounterBloc() : super(0) {    on<CounterIncrementPressed>((event, emit) {      addError(Exception('increment error!'), StackTrace.current);      emit(state + 1);    });  }
  @override  void onChange(Change<int> change) {    super.onChange(change);    print(change);  }
  @override  void onTransition(Transition<CounterEvent, int> transition) {    print(transition);    super.onTransition(transition);  }
  @override  void onError(Object error, StackTrace stackTrace) {    print('$error, $stackTrace');    super.onError(error, stackTrace);  }}
이전과 동일한 main.dart를 다시 실행하면 에러가 보고될 때 어떤 모습인지 확인할
수 있습니다:
Exception: increment error!#0      new CounterBloc.<anonymous closure> (file:///main.dart:10:58)#1      Bloc.on.<anonymous closure>.handleEvent (package:bloc/src/bloc.dart:229:26)#2      Bloc.on.<anonymous closure> (package:bloc/src/bloc.dart:238:9)#3      _MapStream._handleData (dart:async/stream_pipe.dart:213:31)#4      _ForwardingStreamSubscription._handleData (dart:async/stream_pipe.dart:153:13)#5      _RootZone.runUnaryGuarded (dart:async/zone.dart:1594:10)#6      CastStreamSubscription._onData (dart:_internal/async_cast.dart:85:11)#7      _RootZone.runUnaryGuarded (dart:async/zone.dart:1594:10)#8      _BufferingStreamSubscription._sendData (dart:async/stream_impl.dart:339:11)#9      _BufferingStreamSubscription._add (dart:async/stream_impl.dart:271:7)#10     _ForwardingStreamSubscription._add (dart:async/stream_pipe.dart:123:11)#11     _WhereStream._handleData (dart:async/stream_pipe.dart:195:12)#12     _ForwardingStreamSubscription._handleData (dart:async/stream_pipe.dart:153:13)#13     _RootZone.runUnaryGuarded (dart:async/zone.dart:1594:10)#14     _BufferingStreamSubscription._sendData (dart:async/stream_impl.dart:339:11)#15     _DelayedData.perform (dart:async/stream_impl.dart:515:14)#16     _PendingEvents.handleNext (dart:async/stream_impl.dart:620:11)#17     _PendingEvents.schedule.<anonymous closure> (dart:async/stream_impl.dart:591:7)#18     _microtaskLoop (dart:async/schedule_microtask.dart:40:21)#19     _startMicrotaskLoop (dart:async/schedule_microtask.dart:49:5)#20     _runPendingImmediateCallback (dart:isolate-patch/isolate_patch.dart:118:13)#21     _RawReceivePort._handleMessage (dart:isolate-patch/isolate_patch.dart:185:5)
CounterBloc Exception: increment error!#0      new CounterBloc.<anonymous closure> (file:///main.dart:10:58)#1      Bloc.on.<anonymous closure>.handleEvent (package:bloc/src/bloc.dart:229:26)#2      Bloc.on.<anonymous closure> (package:bloc/src/bloc.dart:238:9)#3      _MapStream._handleData (dart:async/stream_pipe.dart:213:31)#4      _ForwardingStreamSubscription._handleData (dart:async/stream_pipe.dart:153:13)#5      _RootZone.runUnaryGuarded (dart:async/zone.dart:1594:10)#6      CastStreamSubscription._onData (dart:_internal/async_cast.dart:85:11)#7      _RootZone.runUnaryGuarded (dart:async/zone.dart:1594:10)#8      _BufferingStreamSubscription._sendData (dart:async/stream_impl.dart:339:11)#9      _BufferingStreamSubscription._add (dart:async/stream_impl.dart:271:7)#10     _ForwardingStreamSubscription._add (dart:async/stream_pipe.dart:123:11)#11     _WhereStream._handleData (dart:async/stream_pipe.dart:195:12)#12     _ForwardingStreamSubscription._handleData (dart:async/stream_pipe.dart:153:13)#13     _RootZone.runUnaryGuarded (dart:async/zone.dart:1594:10)#14     _BufferingStreamSubscription._sendData (dart:async/stream_impl.dart:339:11)#15     _DelayedData.perform (dart:async/stream_impl.dart:515:14)#16     _PendingEvents.handleNext (dart:async/stream_impl.dart:620:11)#17     _PendingEvents.schedule.<anonymous closure> (dart:async/stream_impl.dart:591:7)#18     _microtaskLoop (dart:async/schedule_microtask.dart:40:21)#19     _startMicrotaskLoop (dart:async/schedule_microtask.dart:49:5)#20     _runPendingImmediateCallback (dart:isolate-patch/isolate_patch.dart:118:13)#21     _RawReceivePort._handleMessage (dart:isolate-patch/isolate_patch.dart:185:5)
Transition { currentState: 0, event: Instance of 'CounterIncrementPressed', nextState: 1 }CounterBloc Transition { currentState: 0, event: Instance of 'CounterIncrementPressed', nextState: 1 }CounterBloc Change { currentState: 0, nextState: 1 }Change { currentState: 0, nextState: 1 }Cubit vs. Bloc
Section titled “Cubit vs. Bloc”이제 Cubit과 Bloc 클래스의 기본 사항을 살펴봤으니 언제 Cubit을 사용해야
하는지, 언제 Bloc을 사용해야 하는지 궁금하실 것입니다.
Cubit 장점
Section titled “Cubit 장점”Cubit 사용의 가장 큰 장점 중 하나는 단순성입니다. Cubit을 생성할 때는
state와 state를 변경하기 위해 노출할 함수만 정의하면 됩니다. 반면에 Bloc을
생성할 때는 state, event, EventHandler 구현을 정의해야 합니다. 따라서
Cubit을 더 쉽게 이해할 수 있고 관련된 코드도 더 적습니다.
이제 두 가지 카운터 구현을 살펴보겠습니다:
CounterCubit
Section titled “CounterCubit”class CounterCubit extends Cubit<int> { CounterCubit() : super(0);
void increment() => emit(state + 1);}CounterBloc
Section titled “CounterBloc”sealed class CounterEvent {}final class CounterIncrementPressed extends CounterEvent {}
class CounterBloc extends Bloc<CounterEvent, int> { CounterBloc() : super(0) { on<CounterIncrementPressed>((event, emit) => emit(state + 1)); }}Cubit 구현은 더 간결하며 event를 별도로 정의하는 대신 함수가 event처럼
작동합니다. 또한, Cubit을 사용할 때는 어디서든 emit을 호출하여 state 변경을
촉발할 수 있습니다.
Bloc 장점
Section titled “Bloc 장점”Bloc 사용의 가장 큰 장점 중 하나는 state 변경의 순서와 그 변경을 유발한 원인을
정확히 파악할 수 있다는 점입니다. 애플리케이션의 기능에 중요한 state의 경우
state 변경 외에도 모든 event를 캡처하기 위해, 보다 event 중심적인 접근 방식을
사용하는 것이 매우 유용할 수 있습니다.
일반적인 사용 사례는 AuthenticationState를 관리하는 것입니다. 간단히 설명하기
위해 enum을 통해 AuthenticationState를 표현할 수 있다고 가정해 보겠습니다:
enum AuthenticationState { unknown, authenticated, unauthenticated }애플리케이션의 state가 authenticated에서 unauthenticated로 변경되는 이유는
여러 가지가 있을 수 있습니다. 예로 들어 사용자가 로그아웃 버튼을 탭하고
애플리케이션에서 로그아웃을 요청했을 수 있습니다. 반면에 사용자의 access token이
해지되어 강제로 로그아웃되었을 수도 있습니다. Bloc을 사용하면 애플리케이션
state가 특정 state에 도달한 경로를 명확하게 추적할 수 있습니다.
Transition { currentState: AuthenticationState.authenticated, event: LogoutRequested, nextState: AuthenticationState.unauthenticated}위의 Transition은 state가 변경된 이유를 이해하는데 필요한 모든 정보를
제공합니다. 만약 Cubit을 사용해 AuthenticationState를 관리했다면, 로그는
다음과 같이 보일 것입니다:
Change { currentState: AuthenticationState.authenticated, nextState: AuthenticationState.unauthenticated}이는 사용자가 로그아웃되었다는 사실을 알려주지만, 시간이 지남에 따라 상태가 어떻게 변하는지 디버깅하고 이해하는데 무엇이 중요한지 설명하지 않습니다.
고급 Event Transformations
Section titled “고급 Event Transformations”Bloc이 Cubit보다 뛰어난 또 다른 영역은 buffer, debounceTime, throttle
등과 같은 반응형 연산자를 활용해야 하는 경우입니다.
Bloc에는 들어오는 event의 흐름을 제어하고 변환할 수 있는 event sink가
있습니다.
예를 들어, 실시간 검색을 구축하는 경우 속도 제한을 피하고 백엔드의 비용/부하를 줄이기 위해 백엔드에 대한 요청을 debouncing하고 싶을 것입니다.
Bloc을 사용하면 Bloc이 수신 event를 처리하는 방식을 변경하는 커스텀
EventTransformer를 제공할 수 있습니다.
EventTransformer<T> debounce<T>(Duration duration) {  return (events, mapper) => events.debounceTime(duration).flatMap(mapper);}
CounterBloc() : super(0) {  on<Increment>(    (event, emit) => emit(state + 1),    /// Apply the custom `EventTransformer` to the `EventHandler`.    transformer: debounce(const Duration(milliseconds: 300)),  );}
위의 코드를 사용하면 추가 코드를 거의 추가하지 않고도 수신 event를 쉽게 debounce할 수 있습니다.
어떤 것을 사용해야 할지 잘 모르겠다면 Cubit으로 시작하고 나중에 필요에 따라
Bloc으로 리펙토링하거나 스케일업할 수 있습니다.