아키텍쳐
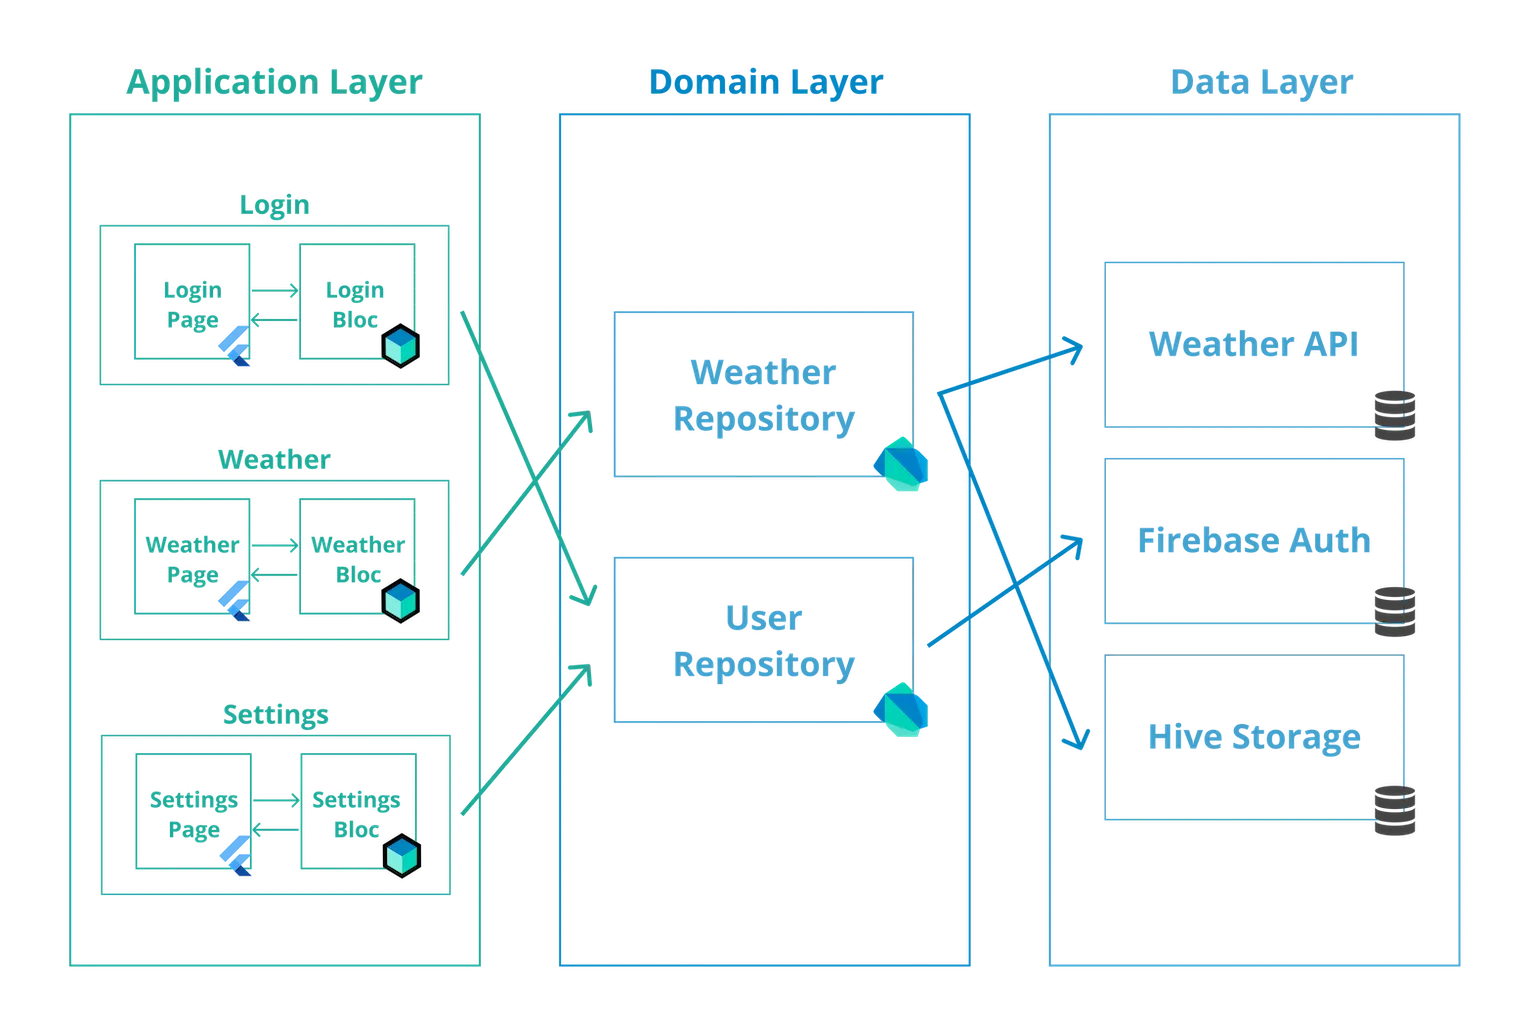
Bloc 라이브러리를 사용하면 애플리케이션을 세 가지 레이어로 분리할 수 있습니다:
- Presentation
- Business Logic
- Data
- Repository
- Data Provider
이제 가장 아래 수준(사용자 인터페이스로부터 가장 멀리 떨어진)의 레이어 부터 시작하여 Presentation 레이어까지 작업해 보겠습니다.
Data 레이어는 하나 이상의 소스에서 데이터를 검색/조작하는 책임을 맡습니다.
따라서 Data 레이어는 두 부분으로 나뉠 수 있습니다:
- Repository
- Data Provider
이 레이어는 애플리케이션의 가장 아래 수준이며 데이터베이스, 네트워크 요청 및 기타 비동기 데이터 소스와 상호 작용합니다.
Data Provider는 원시(raw) 데이터를 제공하는 것입니다. Data Provider는 일반적이고 가변적이어야 합니다.
일반적으로 Data Provider는 간단한 API를 노출하여 CRUD 작업을 수행합니다.
따라서 Data 레이어의 일부로 createData, readData, updateData, 그리고 deleteData 메서드가 있을 수 있습니다.
class DataProvider { Future<RawData> readData() async { // Read from DB or make network request etc... }}Repository는 Bloc 계층이 통신하는 하나 이상의 Data Provider를 감싸는 래퍼(Wrapper) 입니다.
class Repository {    final DataProviderA dataProviderA;    final DataProviderB dataProviderB;
    Future<Data> getAllDataThatMeetsRequirements() async {        final RawDataA dataSetA = await dataProviderA.readData();        final RawDataB dataSetB = await dataProviderB.readData();
        final Data filteredData = _filterData(dataSetA, dataSetB);        return filteredData;    }}
보이시는 바와 같이, Repository 계층은 여러 Data Provider와 상호 작용하고, 데이터에 대한 변환을 수행한 후 그 결과를 Business Logic 레이어로 전달할 수 있습니다.
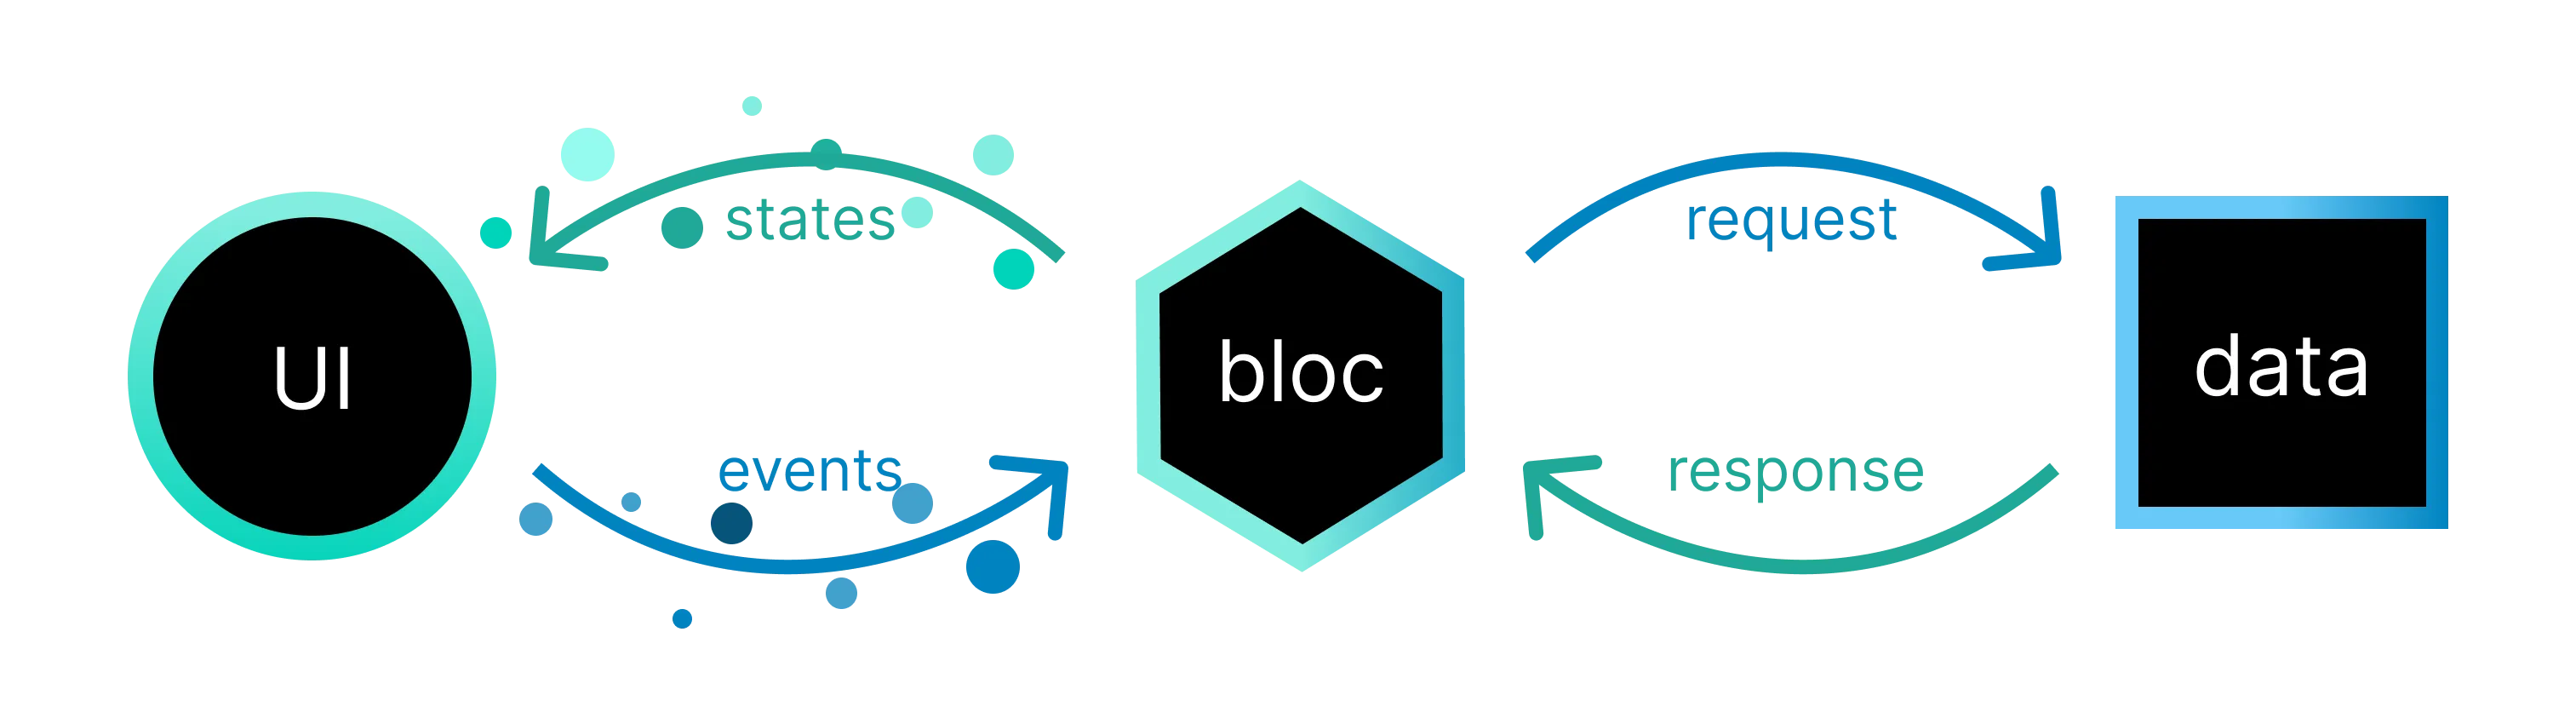
Business Logic 레이어는 Presentation 레이어의 입력에 대해 새로운 상태로 응답하는 책임을 갖습니다.
Business Logic 레이어를 사용자 인터페이스(Presentation 레이어)와 Data 레이어 사이의 다리라고 생각해도 좋습니다. Business Logic 레이어는 Presentation 레이어로부터 events/actions에 대한 알림을 받은 다음, Repository와 통신하여 Presentation 레이어가 사용할 새 state를 구축합니다.
class BusinessLogicComponent extends Bloc<MyEvent, MyState> {    BusinessLogicComponent(this.repository) {        on<AppStarted>((event, emit) {            try {                final data = await repository.getAllDataThatMeetsRequirements();                emit(Success(data));            } catch (error) {                emit(Failure(error));            }        });    }
final Repository repository;}Bloc은 스트림(Stream)을 노출하기 때문에 다른 bloc을 수신하는 bloc을 만들고 싶은 경우가 있을 수 있겠습니다만, 절대로 이렇게 하면 안 됩니다. 아래에 소개되는 코드보다 더 나은 대안이 있습니다.
class TightlyCoupledBloc extends Bloc {  final OtherBloc otherBloc;  late final StreamSubscription otherBlocSubscription;
  TightlyCoupledBloc(this.otherBloc) {    // No matter how much you are tempted to do this, you should not do this!    // Keep reading for better alternatives!    otherBlocSubscription = otherBloc.stream.listen((state) {      add(MyEvent());    });  }
  @override  Future<void> close() {    otherBlocSubscription.cancel();    return super.close();  }}
위에 소개된 코드에 오류는 없지만(심지어 스트림 구독 해체 로직도 있지만) 더 큰 문제가 존재합니다: 두 bloc간 종속성을 생성하는 문제
일반적으로, 동일한 아키텍쳐 레이어이 있는 두 엔티티(Entity)간 남매 종속성(Sibling dependencies)은 유지보수하기 어려운 긴밀한 결합을 생성하기 때문에 어떤 대가를 치르더라도 반드시 피해야 합니다. Bloc은 Business Logic 아키텍쳐 레이어에 존재하기 때문에 어떠한 bloc도 다른 bloc에 대해 알면 안 됩니다.
Bloc은 events와 종속성 주입된 Repository(즉, 생성자에서 bloc에 주입된 repository)를 통해서만 정보를 수신해야 합니다.
한 bloc이 다른 bloc에 응답해야 하는 상황에 처한 경우 두 가지 다른 대안이 있습니다. 연결 문제를 한 레이어 위로(Presentation 레이어로) 올리거나, 한 레이어 아래로(Domain 레이어로) 내릴 수 있습니다.
BlocListener를 사용하여 한 bloc(FirstBloc)을 수신하고, 이 bloc이 변경될 때 마다 다른 bloc(SecondBloc)에 event를 추가할 수 있습니다.
class MyWidget extends StatelessWidget {  const MyWidget({Key? key}) : super(key: key);
  @override  Widget build(BuildContext context) {    return BlocListener<FirstBloc, FirstState>(      listener: (context, state) {        // When the first bloc's state changes, this will be called.        //        // Now we can add an event to the second bloc without it having        // to know about the first bloc.        context.read<SecondBloc>().add(SecondEvent());      },      child: TextButton(        child: const Text('Hello'),        onPressed: () {          context.read<FirstBloc>().add(FirstEvent());        },      ),    );  }}
위의 코드는 SecondBloc이 FirstBloc에 대해 알 필요가 없도록 하여 느슨한 결합을 유도합니다. flutter_weather 애플리케이션은 이 기법을 사용하여 수신된 날씨 정보에 따라 앱 테마를 변경합니다.
어떤 상황에서는 Presentation 레이어에서 두 bloc을 연결하고 싶지 않을 수 있습니다. 이런 경우에는 두 bloc이 동일한 데이터 소스를 공유하고 데이터가 변경될 때 마다 업데이트하는 것이 합리적일 수 있습니다.
두 bloc은 Repository에서 Stream을 수신하고 Repository 데이터가 변경될 때 마다 서로 독립적으로 상태를 업데이트 할 수 있습니다. Reactive repository를 사용하여 state를 동기화 하는 것은 대규모 기업체 애플리케이션에서 흔히 볼 수 있습니다.
우선, 데이터 Stream을 제공하는 Repository를 만들거나 사용합니다. 예를 들어, 아래에 소개되는 Repository는 몇 가지 앱 아이디어에 대한 무한히 반복되는 Stream을 노출합니다:
class AppIdeasRepository {  int _currentAppIdea = 0;  final List<String> _ideas = [    "Future prediction app that rewards you if you predict the next day's news",    'Dating app for fish that lets your aquarium occupants find true love',    'Social media app that pays you when your data is sold',    'JavaScript framework gambling app that lets you bet on the next big thing',    'Solitaire app that freezes before you can win',  ];
  Stream<String> productIdeas() async* {    while (true) {      yield _ideas[_currentAppIdea++ % _ideas.length];      await Future<void>.delayed(const Duration(minutes: 1));    }  }}
새로운 앱 아이디어에 반응해야 하는 각 bloc에 동일한 Repository를 종속성 주입할 수 있습니다. 아래의 코드는 위의 Repository에서 들어오는 각 앱 아이디어에 대한 state를 yield하는 AppIdeaRankingBloc입니다:
class AppIdeaRankingBloc    extends Bloc<AppIdeaRankingEvent, AppIdeaRankingState> {  AppIdeaRankingBloc({required AppIdeasRepository appIdeasRepo})      : _appIdeasRepo = appIdeasRepo,        super(AppIdeaInitialRankingState()) {    on<AppIdeaStartRankingEvent>((event, emit) async {      // When we are told to start ranking app ideas, we will listen to the      // stream of app ideas and emit a state for each one.      await emit.forEach(        _appIdeasRepo.productIdeas(),        onData: (String idea) => AppIdeaRankingIdeaState(idea: idea),      );    });  }
  final AppIdeasRepository _appIdeasRepo;}
Bloc에서 Stream을 사용하는 방법에 대한 자세한 내용은 Streams 그리고 Concurrency에서 Bloc을 사용하는 방법을 참조하세요.
Presentation 레이어는 하나 이상의 bloc state를 기반하여 렌더링하는 방법을 알아내야 하는 책임을 갖습니다.
대부분의 애플리케이션 흐름은 애플리케이션이 사용자에게 표시할 일부 데이터를 가져오도록 촉발하는 AppStart event로부터 시작합니다.
이 시나리오에서 Presentation 레이어는 AppStart event를 추가합니다.
또한, Presentation 레이어는 bloc 레이어의 state를 기반으로 화면에 렌더링할 내용을 파악해야 합니다.
class PresentationComponent {  PresentationComponent({required this.bloc}) {    bloc.add(AppStarted());  }
  final Bloc bloc;
  build() {    // render UI based on bloc state  }}
지금까지 몇 가지 코드 스니펫을 살펴봤지만, 이 모든것은 상당히 높은 수준이었습니다. 튜토리얼 섹션에서는 여러 가지 예제 앱을 빌드하면서 이 모든 것을 종합해 보겠습니다.