Bloc Concepts
Dieser Inhalt ist noch nicht in deiner Sprache verfügbar.
There are several core concepts that are critical to understanding how to use the bloc package.
In the upcoming sections, we’re going to discuss each of them in detail as well as work through how they would apply to a counter app.
Streams
Section titled “Streams”A stream is a sequence of asynchronous data.
In order to use the bloc library, it is critical to have a basic understanding
of Streams and how they work.
If you’re unfamiliar with Streams just think of a pipe with water flowing
through it. The pipe is the Stream and the water is the asynchronous data.
We can create a Stream in Dart by writing an async* (async generator)
function.
Stream<int> countStream(int max) async* { for (int i = 0; i < max; i++) { yield i; }}By marking a function as async* we are able to use the yield keyword and
return a Stream of data. In the above example, we are returning a Stream of
integers up to the max integer parameter.
Every time we yield in an async* function we are pushing that piece of data
through the Stream.
We can consume the above Stream in several ways. If we wanted to write a
function to return the sum of a Stream of integers it could look something
like:
Future<int> sumStream(Stream<int> stream) async { int sum = 0; await for (int value in stream) { sum += value; } return sum;}By marking the above function as async we are able to use the await keyword
and return a Future of integers. In this example, we are awaiting each value
in the stream and returning the sum of all integers in the stream.
We can put it all together like so:
void main() async { /// Initialize a stream of integers 0-9 Stream<int> stream = countStream(10); /// Compute the sum of the stream of integers int sum = await sumStream(stream); /// Print the sum print(sum); // 45}Now that we have a basic understanding of how Streams work in Dart we’re ready
to learn about the core component of the bloc package: a Cubit.
A Cubit is a class which extends BlocBase and can be extended to manage any
type of state.
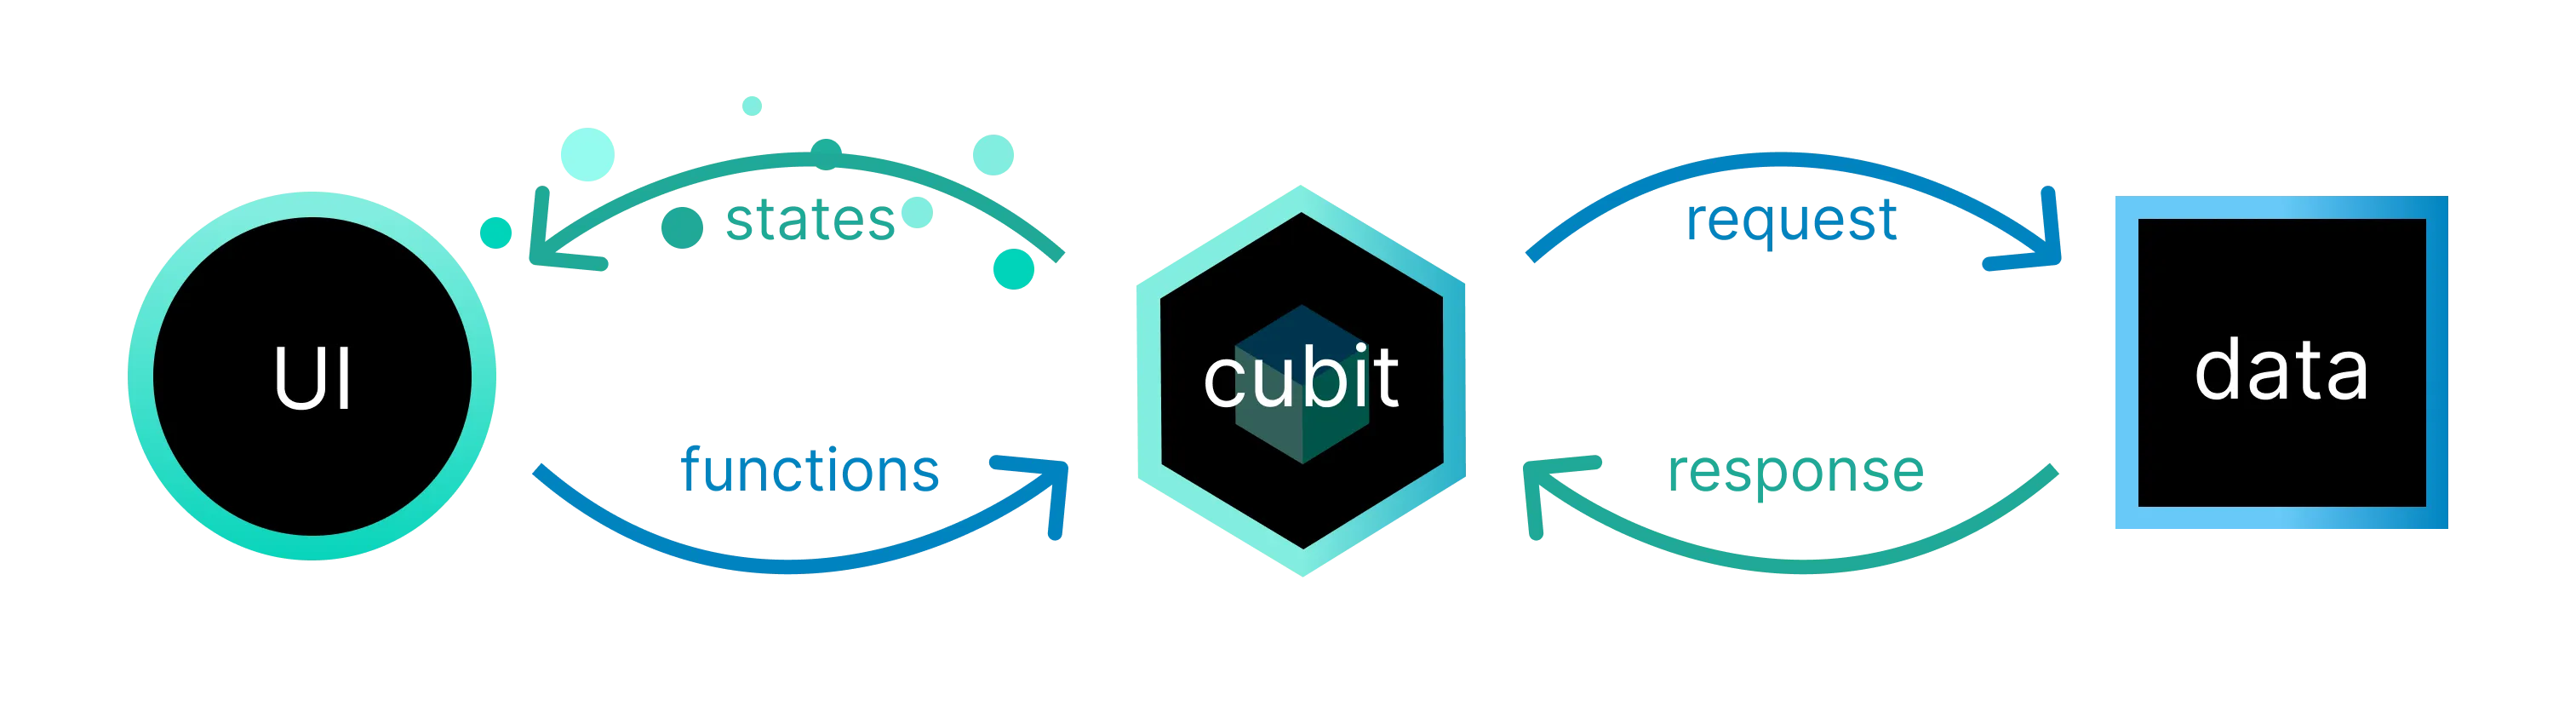
A Cubit can expose functions which can be invoked to trigger state changes.
States are the output of a Cubit and represent a part of your application’s
state. UI components can be notified of states and redraw portions of themselves
based on the current state.
Creating a Cubit
Section titled “Creating a Cubit”We can create a CounterCubit like:
class CounterCubit extends Cubit<int> { CounterCubit() : super(0);}When creating a Cubit, we need to define the type of state which the Cubit
will be managing. In the case of the CounterCubit above, the state can be
represented via an int but in more complex cases it might be necessary to use
a class instead of a primitive type.
The second thing we need to do when creating a Cubit is specify the initial
state. We can do this by calling super with the value of the initial state. In
the snippet above, we are setting the initial state to 0 internally but we can
also allow the Cubit to be more flexible by accepting an external value:
class CounterCubit extends Cubit<int> { CounterCubit(int initialState) : super(initialState);}This would allow us to instantiate CounterCubit instances with different
initial states like:
final cubitA = CounterCubit(0); // state starts at 0final cubitB = CounterCubit(10); // state starts at 10Cubit State Changes
Section titled “Cubit State Changes”Each Cubit has the ability to output a new state via emit.
class CounterCubit extends Cubit<int> {  CounterCubit() : super(0);
  void increment() => emit(state + 1);}
In the above snippet, the CounterCubit is exposing a public method called
increment which can be called externally to notify the CounterCubit to
increment its state. When increment is called, we can access the current state
of the Cubit via the state getter and emit a new state by adding 1 to the
current state.
Using a Cubit
Section titled “Using a Cubit”We can now take the CounterCubit we’ve implemented and put it to use!
Basic Usage
Section titled “Basic Usage”void main() { final cubit = CounterCubit(); print(cubit.state); // 0 cubit.increment(); print(cubit.state); // 1 cubit.close();}In the above snippet, we start by creating an instance of the CounterCubit. We
then print the current state of the cubit which is the initial state (since no
new states have been emitted yet). Next, we call the increment function to
trigger a state change. Finally, we print the state of the Cubit again which
went from 0 to 1 and call close on the Cubit to close the internal state
stream.
Stream Usage
Section titled “Stream Usage”Cubit exposes a Stream which allows us to receive real-time state updates:
Future<void> main() async { final cubit = CounterCubit(); final subscription = cubit.stream.listen(print); // 1 cubit.increment(); await Future.delayed(Duration.zero); await subscription.cancel(); await cubit.close();}In the above snippet, we are subscribing to the CounterCubit and calling print
on each state change. We are then invoking the increment function which will
emit a new state. Lastly, we are calling cancel on the subscription when we
no longer want to receive updates and closing the Cubit.
Observing a Cubit
Section titled “Observing a Cubit”When a Cubit emits a new state, a Change occurs. We can observe all changes
for a given Cubit by overriding onChange.
class CounterCubit extends Cubit<int> {  CounterCubit() : super(0);
  void increment() => emit(state + 1);
  @override  void onChange(Change<int> change) {    super.onChange(change);    print(change);  }}
We can then interact with the Cubit and observe all changes output to the
console.
void main() { CounterCubit() ..increment() ..close();}The above example would output:
Change { currentState: 0, nextState: 1 }BlocObserver
Section titled “BlocObserver”One added bonus of using the bloc library is that we can have access to all
Changes in one place. Even though in this application we only have one
Cubit, it’s fairly common in larger applications to have many Cubits
managing different parts of the application’s state.
If we want to be able to do something in response to all Changes we can simply
create our own BlocObserver.
class SimpleBlocObserver extends BlocObserver { @override void onChange(BlocBase bloc, Change change) { super.onChange(bloc, change); print('${bloc.runtimeType} $change'); }}In order to use the SimpleBlocObserver, we just need to tweak the main
function:
void main() { Bloc.observer = SimpleBlocObserver(); CounterCubit() ..increment() ..close();}The above snippet would then output:
CounterCubit Change { currentState: 0, nextState: 1 }Change { currentState: 0, nextState: 1 }Cubit Error Handling
Section titled “Cubit Error Handling”Every Cubit has an addError method which can be used to indicate that an
error has occurred.
class CounterCubit extends Cubit<int> {  CounterCubit() : super(0);
  void increment() {    addError(Exception('increment error!'), StackTrace.current);    emit(state + 1);  }
  @override  void onChange(Change<int> change) {    super.onChange(change);    print(change);  }
@override void onError(Object error, StackTrace stackTrace) { print('$error, $stackTrace'); super.onError(error, stackTrace); }}onError can also be overridden in BlocObserver to handle all reported errors
globally.
class SimpleBlocObserver extends BlocObserver {  @override  void onChange(BlocBase bloc, Change change) {    super.onChange(bloc, change);    print('${bloc.runtimeType} $change');  }
  @override  void onError(BlocBase bloc, Object error, StackTrace stackTrace) {    print('${bloc.runtimeType} $error $stackTrace');    super.onError(bloc, error, stackTrace);  }}
If we run the same program again we should see the following output:
Exception: increment error!#0      CounterCubit.increment (file:///main.dart:7:56)#1      main (file:///main.dart:41:7)#2      _delayEntrypointInvocation.<anonymous closure> (dart:isolate-patch/isolate_patch.dart:297:19)#3      _RawReceivePort._handleMessage (dart:isolate-patch/isolate_patch.dart:184:12)
CounterCubit Exception: increment error!#0      CounterCubit.increment (file:///main.dart:7:56)#1      main (file:///main.dart:41:7)#2      _delayEntrypointInvocation.<anonymous closure> (dart:isolate-patch/isolate_patch.dart:297:19)#3      _RawReceivePort._handleMessage (dart:isolate-patch/isolate_patch.dart:184:12)
CounterCubit Change { currentState: 0, nextState: 1 }Change { currentState: 0, nextState: 1 }A Bloc is a more advanced class which relies on events to trigger state
changes rather than functions. Bloc also extends BlocBase which means it has
a similar public API as Cubit. However, rather than calling a function on a
Bloc and directly emitting a new state, Blocs receive events and convert
the incoming events into outgoing states.

Creating a Bloc
Section titled “Creating a Bloc”Creating a Bloc is similar to creating a Cubit except in addition to
defining the state that we’ll be managing, we must also define the event that
the Bloc will be able to process.
Events are the input to a Bloc. They are commonly added in response to user interactions such as button presses or lifecycle events like page loads.
sealed class CounterEvent {}
final class CounterIncrementPressed extends CounterEvent {}
class CounterBloc extends Bloc<CounterEvent, int> {  CounterBloc() : super(0);}
Just like when creating the CounterCubit, we must specify an initial state by
passing it to the superclass via super.
Bloc State Changes
Section titled “Bloc State Changes”Bloc requires us to register event handlers via the on<Event> API, as
opposed to functions in Cubit. An event handler is responsible for converting
any incoming events into zero or more outgoing states.
sealed class CounterEvent {}
final class CounterIncrementPressed extends CounterEvent {}
class CounterBloc extends Bloc<CounterEvent, int> { CounterBloc() : super(0) { on<CounterIncrementPressed>((event, emit) { // handle incoming `CounterIncrementPressed` event }); }}We can then update the EventHandler to handle the CounterIncrementPressed
event:
sealed class CounterEvent {}
final class CounterIncrementPressed extends CounterEvent {}
class CounterBloc extends Bloc<CounterEvent, int> {  CounterBloc() : super(0) {    on<CounterIncrementPressed>((event, emit) {      emit(state + 1);    });  }}
In the above snippet, we have registered an EventHandler to manage all
CounterIncrementPressed events. For each incoming CounterIncrementPressed
event we can access the current state of the bloc via the state getter and
emit(state + 1).
Using a Bloc
Section titled “Using a Bloc”At this point, we can create an instance of our CounterBloc and put it to use!
Basic Usage
Section titled “Basic Usage”Future<void> main() async { final bloc = CounterBloc(); print(bloc.state); // 0 bloc.add(CounterIncrementPressed()); await Future.delayed(Duration.zero); print(bloc.state); // 1 await bloc.close();}In the above snippet, we start by creating an instance of the CounterBloc. We
then print the current state of the Bloc which is the initial state (since no
new states have been emitted yet). Next, we add the CounterIncrementPressed
event to trigger a state change. Finally, we print the state of the Bloc again
which went from 0 to 1 and call close on the Bloc to close the internal
state stream.
Stream Usage
Section titled “Stream Usage”Just like with Cubit, a Bloc is a special type of Stream, which means we
can also subscribe to a Bloc for real-time updates to its state:
Future<void> main() async { final bloc = CounterBloc(); final subscription = bloc.stream.listen(print); // 1 bloc.add(CounterIncrementPressed()); await Future.delayed(Duration.zero); await subscription.cancel(); await bloc.close();}In the above snippet, we are subscribing to the CounterBloc and calling print
on each state change. We are then adding the CounterIncrementPressed event
which triggers the on<CounterIncrementPressed> EventHandler and emits a new
state. Lastly, we are calling cancel on the subscription when we no longer
want to receive updates and closing the Bloc.
Observing a Bloc
Section titled “Observing a Bloc”Since Bloc extends BlocBase, we can observe all state changes for a Bloc
using onChange.
sealed class CounterEvent {}
final class CounterIncrementPressed extends CounterEvent {}
class CounterBloc extends Bloc<CounterEvent, int> {  CounterBloc() : super(0) {    on<CounterIncrementPressed>((event, emit) => emit(state + 1));  }
  @override  void onChange(Change<int> change) {    super.onChange(change);    print(change);  }}
We can then update main.dart to:
void main() { CounterBloc() ..add(CounterIncrementPressed()) ..close();}Now if we run the above snippet, the output will be:
Change { currentState: 0, nextState: 1 }One key differentiating factor between Bloc and Cubit is that because Bloc
is event-driven, we are also able to capture information about what triggered
the state change.
We can do this by overriding onTransition.
The change from one state to another is called a Transition. A Transition
consists of the current state, the event, and the next state.
sealed class CounterEvent {}
final class CounterIncrementPressed extends CounterEvent {}
class CounterBloc extends Bloc<CounterEvent, int> {  CounterBloc() : super(0) {    on<CounterIncrementPressed>((event, emit) => emit(state + 1));  }
  @override  void onChange(Change<int> change) {    super.onChange(change);    print(change);  }
  @override  void onTransition(Transition<CounterEvent, int> transition) {    super.onTransition(transition);    print(transition);  }}
If we then rerun the same main.dart snippet from before, we should see the
following output:
Transition { currentState: 0, event: Instance of 'CounterIncrementPressed', nextState: 1 }Change { currentState: 0, nextState: 1 }BlocObserver
Section titled “BlocObserver”Just as before, we can override onTransition in a custom BlocObserver to
observe all transitions that occur from a single place.
class SimpleBlocObserver extends BlocObserver {  @override  void onChange(BlocBase bloc, Change change) {    super.onChange(bloc, change);    print('${bloc.runtimeType} $change');  }
  @override  void onTransition(Bloc bloc, Transition transition) {    super.onTransition(bloc, transition);    print('${bloc.runtimeType} $transition');  }
  @override  void onError(BlocBase bloc, Object error, StackTrace stackTrace) {    print('${bloc.runtimeType} $error $stackTrace');    super.onError(bloc, error, stackTrace);  }}
We can initialize the SimpleBlocObserver just like before:
void main() { Bloc.observer = SimpleBlocObserver(); CounterBloc() ..add(CounterIncrementPressed()) ..close();}Now if we run the above snippet, the output should look like:
CounterBloc Transition { currentState: 0, event: Instance of 'CounterIncrementPressed', nextState: 1 }Transition { currentState: 0, event: Instance of 'CounterIncrementPressed', nextState: 1 }CounterBloc Change { currentState: 0, nextState: 1 }Change { currentState: 0, nextState: 1 }Another unique feature of Bloc instances is that they allow us to override
onEvent which is called whenever a new event is added to the Bloc. Just like
with onChange and onTransition, onEvent can be overridden locally as well
as globally.
sealed class CounterEvent {}
final class CounterIncrementPressed extends CounterEvent {}
class CounterBloc extends Bloc<CounterEvent, int> {  CounterBloc() : super(0) {    on<CounterIncrementPressed>((event, emit) => emit(state + 1));  }
  @override  void onEvent(CounterEvent event) {    super.onEvent(event);    print(event);  }
  @override  void onChange(Change<int> change) {    super.onChange(change);    print(change);  }
@override void onTransition(Transition<CounterEvent, int> transition) { super.onTransition(transition); print(transition); }}class SimpleBlocObserver extends BlocObserver { @override void onEvent(Bloc bloc, Object? event) { super.onEvent(bloc, event); print('${bloc.runtimeType} $event'); }
@override void onChange(BlocBase bloc, Change change) { super.onChange(bloc, change); print('${bloc.runtimeType} $change'); }
@override void onTransition(Bloc bloc, Transition transition) { super.onTransition(bloc, transition); print('${bloc.runtimeType} $transition'); }}We can run the same main.dart as before and should see the following output:
CounterBloc Instance of 'CounterIncrementPressed'Instance of 'CounterIncrementPressed'CounterBloc Transition { currentState: 0, event: Instance of 'CounterIncrementPressed', nextState: 1 }Transition { currentState: 0, event: Instance of 'CounterIncrementPressed', nextState: 1 }CounterBloc Change { currentState: 0, nextState: 1 }Change { currentState: 0, nextState: 1 }Bloc Error Handling
Section titled “Bloc Error Handling”Just like with Cubit, each Bloc has an addError and onError method. We
can indicate that an error has occurred by calling addError from anywhere
inside our Bloc. We can then react to all errors by overriding onError just
as with Cubit.
sealed class CounterEvent {}
final class CounterIncrementPressed extends CounterEvent {}
class CounterBloc extends Bloc<CounterEvent, int> {  CounterBloc() : super(0) {    on<CounterIncrementPressed>((event, emit) {      addError(Exception('increment error!'), StackTrace.current);      emit(state + 1);    });  }
  @override  void onChange(Change<int> change) {    super.onChange(change);    print(change);  }
  @override  void onTransition(Transition<CounterEvent, int> transition) {    print(transition);    super.onTransition(transition);  }
  @override  void onError(Object error, StackTrace stackTrace) {    print('$error, $stackTrace');    super.onError(error, stackTrace);  }}
If we rerun the same main.dart as before, we can see what it looks like when
an error is reported:
Exception: increment error!#0      new CounterBloc.<anonymous closure> (file:///main.dart:10:58)#1      Bloc.on.<anonymous closure>.handleEvent (package:bloc/src/bloc.dart:229:26)#2      Bloc.on.<anonymous closure> (package:bloc/src/bloc.dart:238:9)#3      _MapStream._handleData (dart:async/stream_pipe.dart:213:31)#4      _ForwardingStreamSubscription._handleData (dart:async/stream_pipe.dart:153:13)#5      _RootZone.runUnaryGuarded (dart:async/zone.dart:1594:10)#6      CastStreamSubscription._onData (dart:_internal/async_cast.dart:85:11)#7      _RootZone.runUnaryGuarded (dart:async/zone.dart:1594:10)#8      _BufferingStreamSubscription._sendData (dart:async/stream_impl.dart:339:11)#9      _BufferingStreamSubscription._add (dart:async/stream_impl.dart:271:7)#10     _ForwardingStreamSubscription._add (dart:async/stream_pipe.dart:123:11)#11     _WhereStream._handleData (dart:async/stream_pipe.dart:195:12)#12     _ForwardingStreamSubscription._handleData (dart:async/stream_pipe.dart:153:13)#13     _RootZone.runUnaryGuarded (dart:async/zone.dart:1594:10)#14     _BufferingStreamSubscription._sendData (dart:async/stream_impl.dart:339:11)#15     _DelayedData.perform (dart:async/stream_impl.dart:515:14)#16     _PendingEvents.handleNext (dart:async/stream_impl.dart:620:11)#17     _PendingEvents.schedule.<anonymous closure> (dart:async/stream_impl.dart:591:7)#18     _microtaskLoop (dart:async/schedule_microtask.dart:40:21)#19     _startMicrotaskLoop (dart:async/schedule_microtask.dart:49:5)#20     _runPendingImmediateCallback (dart:isolate-patch/isolate_patch.dart:118:13)#21     _RawReceivePort._handleMessage (dart:isolate-patch/isolate_patch.dart:185:5)
CounterBloc Exception: increment error!#0      new CounterBloc.<anonymous closure> (file:///main.dart:10:58)#1      Bloc.on.<anonymous closure>.handleEvent (package:bloc/src/bloc.dart:229:26)#2      Bloc.on.<anonymous closure> (package:bloc/src/bloc.dart:238:9)#3      _MapStream._handleData (dart:async/stream_pipe.dart:213:31)#4      _ForwardingStreamSubscription._handleData (dart:async/stream_pipe.dart:153:13)#5      _RootZone.runUnaryGuarded (dart:async/zone.dart:1594:10)#6      CastStreamSubscription._onData (dart:_internal/async_cast.dart:85:11)#7      _RootZone.runUnaryGuarded (dart:async/zone.dart:1594:10)#8      _BufferingStreamSubscription._sendData (dart:async/stream_impl.dart:339:11)#9      _BufferingStreamSubscription._add (dart:async/stream_impl.dart:271:7)#10     _ForwardingStreamSubscription._add (dart:async/stream_pipe.dart:123:11)#11     _WhereStream._handleData (dart:async/stream_pipe.dart:195:12)#12     _ForwardingStreamSubscription._handleData (dart:async/stream_pipe.dart:153:13)#13     _RootZone.runUnaryGuarded (dart:async/zone.dart:1594:10)#14     _BufferingStreamSubscription._sendData (dart:async/stream_impl.dart:339:11)#15     _DelayedData.perform (dart:async/stream_impl.dart:515:14)#16     _PendingEvents.handleNext (dart:async/stream_impl.dart:620:11)#17     _PendingEvents.schedule.<anonymous closure> (dart:async/stream_impl.dart:591:7)#18     _microtaskLoop (dart:async/schedule_microtask.dart:40:21)#19     _startMicrotaskLoop (dart:async/schedule_microtask.dart:49:5)#20     _runPendingImmediateCallback (dart:isolate-patch/isolate_patch.dart:118:13)#21     _RawReceivePort._handleMessage (dart:isolate-patch/isolate_patch.dart:185:5)
Transition { currentState: 0, event: Instance of 'CounterIncrementPressed', nextState: 1 }CounterBloc Transition { currentState: 0, event: Instance of 'CounterIncrementPressed', nextState: 1 }CounterBloc Change { currentState: 0, nextState: 1 }Change { currentState: 0, nextState: 1 }Cubit vs. Bloc
Section titled “Cubit vs. Bloc”Now that we’ve covered the basics of the Cubit and Bloc classes, you might
be wondering when you should use Cubit and when you should use Bloc.
Cubit Advantages
Section titled “Cubit Advantages”Simplicity
Section titled “Simplicity”One of the biggest advantages of using Cubit is simplicity. When creating a
Cubit, we only have to define the state as well as the functions which we want
to expose to change the state. In comparison, when creating a Bloc, we have to
define the states, events, and the EventHandler implementation. This makes
Cubit easier to understand and there is less code involved.
Now let’s take a look at the two counter implementations:
CounterCubit
Section titled “CounterCubit”class CounterCubit extends Cubit<int> { CounterCubit() : super(0);
void increment() => emit(state + 1);}CounterBloc
Section titled “CounterBloc”sealed class CounterEvent {}final class CounterIncrementPressed extends CounterEvent {}
class CounterBloc extends Bloc<CounterEvent, int> { CounterBloc() : super(0) { on<CounterIncrementPressed>((event, emit) => emit(state + 1)); }}The Cubit implementation is more concise and instead of defining events
separately, the functions act like events. In addition, when using a Cubit, we
can simply call emit from anywhere in order to trigger a state change.
Bloc Advantages
Section titled “Bloc Advantages”Traceability
Section titled “Traceability”One of the biggest advantages of using Bloc is knowing the sequence of state
changes as well as exactly what triggered those changes. For state that is
critical to the functionality of an application, it might be very beneficial to
use a more event-driven approach in order to capture all events in addition to
state changes.
A common use case might be managing AuthenticationState. For simplicity, let’s
say we can represent AuthenticationState via an enum:
enum AuthenticationState { unknown, authenticated, unauthenticated }There could be many reasons as to why the application’s state could change from
authenticated to unauthenticated. For example, the user might have tapped a
logout button and requested to be signed out of the application. On the other
hand, maybe the user’s access token was revoked and they were forcefully logged
out. When using Bloc we can clearly trace how the application state got to a
certain state.
Transition { currentState: AuthenticationState.authenticated, event: LogoutRequested, nextState: AuthenticationState.unauthenticated}The above Transition gives us all the information we need to understand why
the state changed. If we had used a Cubit to manage the AuthenticationState,
our logs would look like:
Change { currentState: AuthenticationState.authenticated, nextState: AuthenticationState.unauthenticated}This tells us that the user was logged out but it doesn’t explain why which might be critical to debugging and understanding how the state of the application is changing over time.
Advanced Event Transformations
Section titled “Advanced Event Transformations”Another area in which Bloc excels over Cubit is when we need to take
advantage of reactive operators such as buffer, debounceTime, throttle,
etc.
Bloc has an event sink that allows us to control and transform the incoming
flow of events.
For example, if we were building a real-time search, we would probably want to debounce the requests to the backend in order to avoid getting rate-limited as well as to cut down on cost/load on the backend.
With Bloc we can provide a custom EventTransformer to change the way
incoming events are processed by the Bloc.
EventTransformer<T> debounce<T>(Duration duration) {  return (events, mapper) => events.debounceTime(duration).flatMap(mapper);}
CounterBloc() : super(0) {  on<Increment>(    (event, emit) => emit(state + 1),    /// Apply the custom `EventTransformer` to the `EventHandler`.    transformer: debounce(const Duration(milliseconds: 300)),  );}
With the above code, we can easily debounce the incoming events with very little additional code.
If you are unsure about which to use, start with Cubit and you can later
refactor or scale-up to a Bloc as needed.